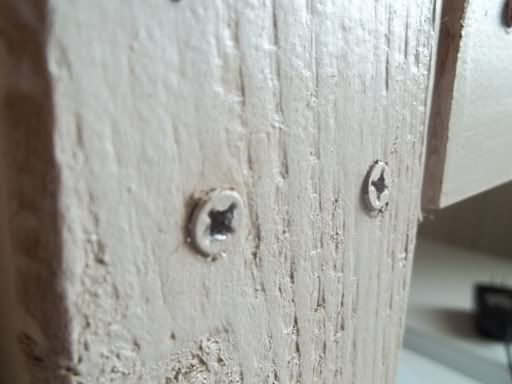
After my first attempt at building a piece of furniture went well, I decided it was time to start adding new friends to my repertoire of tools. Namely, a counter-sink bit for my drill. This is what you use to help make screws sit below the surface of wood so you can put wood putty over it and make everything look perfectly flawless. Now, I wanted our huge hulking delicate little end table to look more rustic, so I didn't care that the screws were showing. But what did bother me was this:

ACK! They're not even flush! I know no one but me would notice it unless they were nose to nose with our table legs, but you have no idea how much it bugged me to look at our perfect table (okay, okay, not-so-perfect table) and see those screws protruding like that! It drove me crazy! So I busted out my newest buddy: a #12 counter-sink bit. They look like this:

I have a Black & Decker drill, but I bought Ryobi bits from Home Depot for about $10 for a pack of 4 different sizes. It works just fine. Now, I couldn't actually get the screws to sink, but I have a feeling that has more to do with the fact that they'd already been put into the wood (versus had I used the counter-sink bit to drill the first time around). But whatever, I'm totally fine with it because look...

My screws now sit flush against the wood. Aaaaahhhh, happy sigh of relief. And when it comes time for my next project, I'll be able to give my piece a polished look if I want to!

ACK! They're not even flush! I know no one but me would notice it unless they were nose to nose with our table legs, but you have no idea how much it bugged me to look at our perfect table (okay, okay, not-so-perfect table) and see those screws protruding like that! It drove me crazy! So I busted out my newest buddy: a #12 counter-sink bit. They look like this:

I have a Black & Decker drill, but I bought Ryobi bits from Home Depot for about $10 for a pack of 4 different sizes. It works just fine. Now, I couldn't actually get the screws to sink, but I have a feeling that has more to do with the fact that they'd already been put into the wood (versus had I used the counter-sink bit to drill the first time around). But whatever, I'm totally fine with it because look...

My screws now sit flush against the wood. Aaaaahhhh, happy sigh of relief. And when it comes time for my next project, I'll be able to give my piece a polished look if I want to!

No comments:
Post a Comment
Thanks for visiting my little slice of the internet! Comments, questions, and feedback are greatly appreciated and I'll do my best to answer (or input) on anything you have to say.
Oh, and FYI: snarky, mean, abusive, or comments meant to start arguments will not be published. This is my happy place. I'd like to keep it that way. :)