Showing posts with label DIY. Show all posts

Friday, March 30, 2012

Table luvre

Issues I had (but cleverly hid in the original reveal photos) with this table:

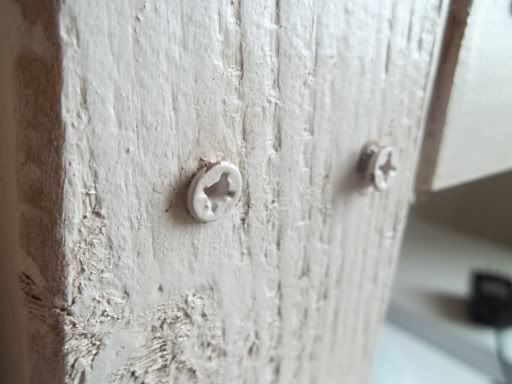
Screws that weren't counter sunk (or even level with the surface)
I didn't use the right screws to begin with, so my drill wasn't able to drive them all the way flat to the wood. Most of them stuck out quite noticeably. I used the right screws on the rebuild and it's made a huge difference in the aesthetics.


Lack of counter sinking = lack of hiding said screws
Investing in a counter sink bit set was one of the smartest things I could have done (aside from investing in a Kreg Jig, which wasn't really around when I originally built this). It enabled me to (properly) wood putty over the screws and hide them. Result? A much more "professional finish."


Paint job
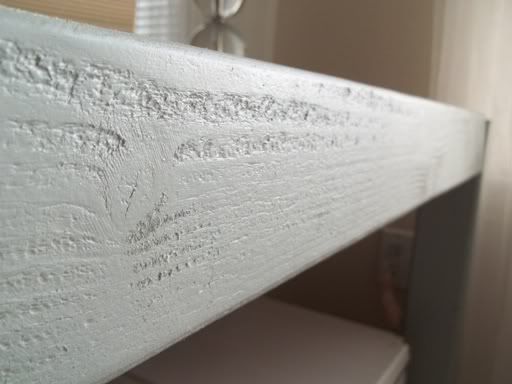
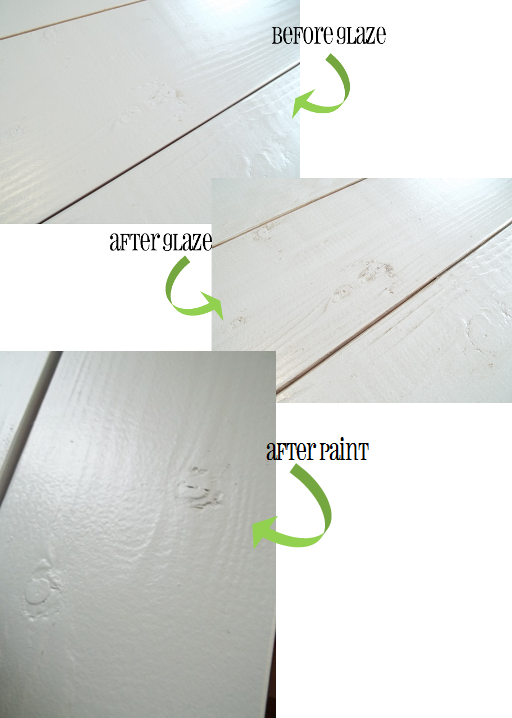
Really, the glazing. Over time my heirloom white paint + Ralph Lauren Smoke glaze = a color that was almost pink and fleshy! Ick. It was really creepy. And it also highlighted every. single. one. of my mistakes or flaws. Plus, it made the table constantly look dirty. Glaze is great, but this was not the right project for it.


Bad decision to try and hide the wood seams
I globbed on the wood putty thinking I could sand it down to a nice smooth finish. Wrong. I ended up making a little sign to place in front of the edge that I messed up on (and put that edge against a wall) just to hide it. This was by far the most labor intensive part of the rebuild. I sanded, chipped, and even used a small handsaw to cut away the layers of wood putty that I caked on. But the ability to have a clean and clear table without having to hide such an obvious boo-boo made it worth it a hundred times over!


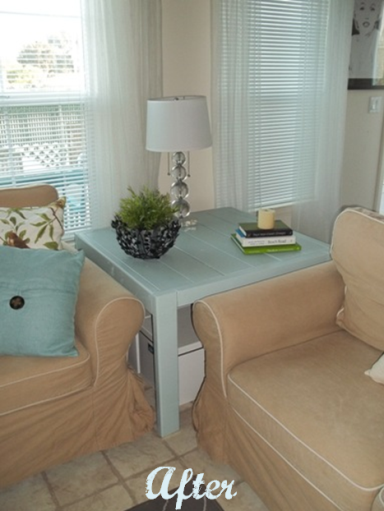
The blue adds such a fun pop of color to our living room, and it ties in with the hutch from the dinning room, and even the bookcases in the office. I have a feeling this color (along with the apple/pea shoot green) is going to become a recurring theme in our house.


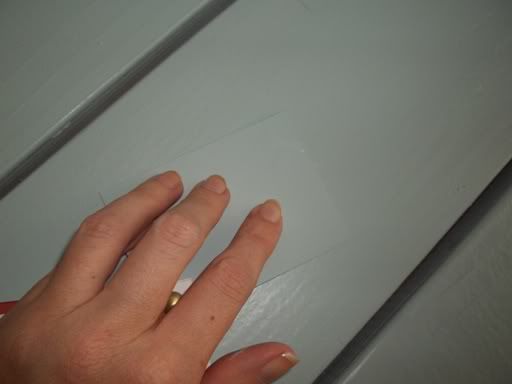
Oh, and for those of you wondering just how close Home Depot managed to color match to my Pottery Barn color swatch...


I'd say pretty damn close!

TOTAL COST: $6 for paint rollers

Wednesday, March 21, 2012

I have no clever title for this post...

Seriously, I must have sat here for a good ten minutes trying to think of something quirky but cute to say about my latest list-crossing-off attempt. Writer's block! Anyhoo...progress is the name of the game! I'm throwing myself into projects to keep my mind off of M#8 (because truthfully, I think about it all. day. long.) and I'm crossing things off of my list with a Zorro-like fever. Take that sconces! Feel my wrath hutch! And currently, my hands are covered in Wedgewood Gray paint from the end table! Woot!

And I mean WOOT.

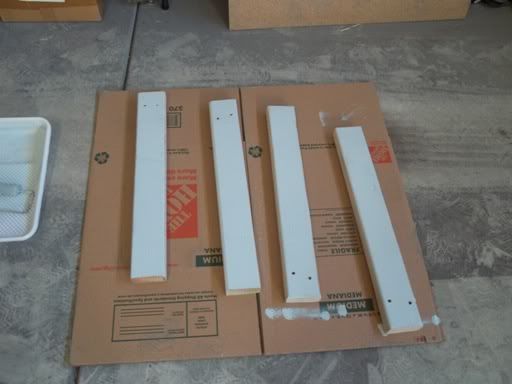
When I first took on this newest make-over, I thought it would be as simple as busting out a roller, maybe removing the legs, and it would be done in a day. HA! Shows how much I know! This was the post I put up on Facebook after my first day of working on it.


For shizz. I was D-O-N-E (and note, that was posted Sunday. It's now Wednesday. Night). I couldn't believe how anal I got about wanting to fix all of the mistakes I made on the first round of building. In all fairness, it was the first thing I've ever built from scratch, so I guess some blunders here and there are bound to happen. The biggest pains (but most rewarding results) have been removing the old caulking and wood putty, and re-drilling the holes with a counter sink bit.


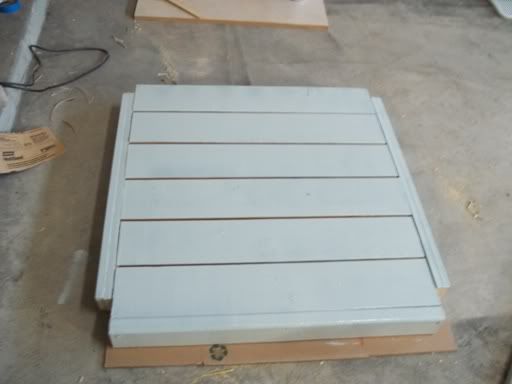
I don't own a Kreg Jig (yet) so after I originally built this piece, I realized how important it was to counter sink screws so they could be filled in properly with wood putty. Also, one of the skirt pieces had to be replaced really bad because I stripped the screw head, tried to remove it by less, um, "conventional means" (read: banging on it with a hammer), and realized salvaging it was hopeless. Luckily, I had a spare piece of matching wood and I'm able to cut a new piece. I'd like to replace the other two sides as well where I doubled up some thinner pieces (you can see them on the left and right sides of this picture), but I'm not too concerned with those at this point.


Okay, and I'm sorry with with all the screws and woods I've dropped in this post, I feel like it's mildly PG-13-ish. No? Just me being immature? Okay...moving on...

The photos above show only one coat of my Wedgewood Gray paint, and I've already added a second. I'm slowly becoming obsessed with this color! I still have to paint in between the planks, but I'm debating on whether or not I'll try to fill in seams this time around. Now that everything has been sanded and repainted it doesn't look as bad with the seams unfinished.

I'm hoping to have it completed by this weekend (or shoot, tomorrow even!). But in non-table make over news, I do have to show you some other artwork I've been working on.


Alright, normally I hate feet shots and my little wrinkly toes are nothing to write home about. But isn't this nail art from Sephora cute?? It's my new favorite "accessory" and I've done a set on my fingers (since removed) and now this one on my toes. The manicure lasted a solid two weeks, and the only reason I removed it was because the grow out from my nails was starting to look less than classy. BONUS: I think it makes your nails stronger because I didn't have a single one break the entire time I wore them. Unheard of for me!

So that's the latest around here. Hopefully I'll have some after photos to share sooner rather than later. Sunday we're supposed to make a trip to IKEA for a few odds and ends (maybe finally get the brackets to complete my Pottery Barn knock-off shelves??) and possibly look at a bed frame for the master bedroom (since the bed is staying).

Feels good to be back up to my elbows in DIY. 

Saturday, March 17, 2012

Grandma's cupboard

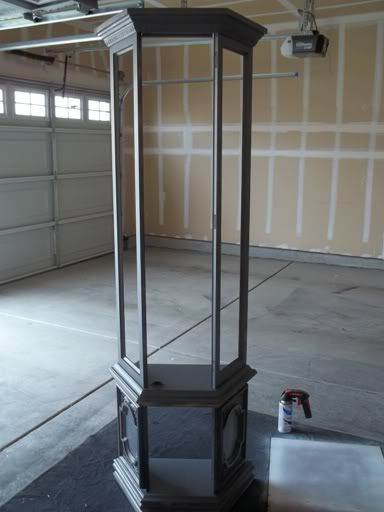
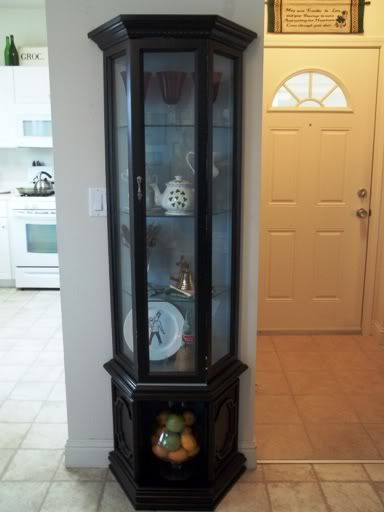
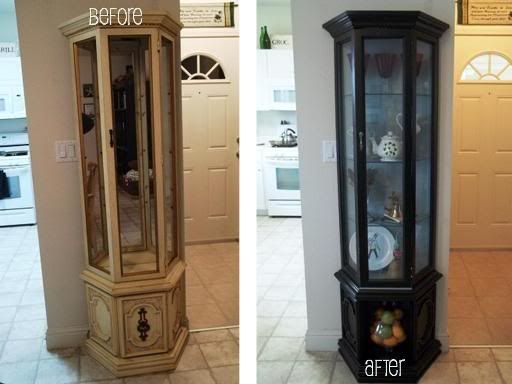
Yay! Score one for me I marked something off my list! Earlier this year (::cough::January!::cough::) my grandma gifted me with this less than desirable cabinet which she was using to house some porcelain "days of the week" dolls.


Okay, let me just make this general disclaimer: the lighting in our house S-U-C-K-S!

When they had new carpet put down in their home, they started getting rid of furniture so there would be less for them to move when the installation day came. Somewhere back in my childhood years I made the comment to my grandma that I wanted the cabinet of dolls and it was something she never forgot. I still haven't learned how to say no to my grandma (maybe that's why we've accumulated so much crap) so before I knew it, we were hauling it away--creepy dolls, bad paint job, and all!


The dolls I knew would be given away, but the longer I looked at my fugly new cabinet, the more I realized it had the potential to be the perfect sized hutch in our dinning room, whether or not I wanted to put actual dishes in it, or just start having a better place to display some of my favorite decor pieces.

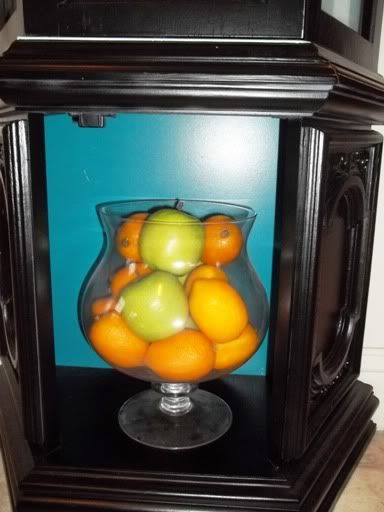
This thing had more staples, screws, hinges, and junk holding it together than I even care to rehash! The paint job was the worst I'd ever seen in my life (vanilla speckled accented in gold? genius!) and more than once I wondered if this was going to be a huge DIY disaster (would we even like it when I finished?). But once it was primed, I was feeling much better. I even opted not to put the lower cabinet door back on, and instead decided to paint the bottom of the backer board with a shot of turquoise spray paint (Rust-Oleum, Lagoon).


I had every intention of putting the mirror back on, but as we were hammering the backer board into place, the mirror fell and shattered into a billion pieces. One of which ended up in my leg (insert horrified screaming here).  I was so bummed I shelved the entire project for about 3 weeks.


Then I saw (and pinned!) this from The Lettered Cottage.


I adored the way the blue looked peeking out of the hutch! Not to mention, it made the hutch look somewhat bigger than (I think) it actually is. I was worried with the shattering of the mirror that my hutch would instantly look squat and tiny painted all black. So I headed down to Home Depot armed with the fan deck we were gifted at my first ever Pottery Barn decorating class. I had them color match "Wedgewood Gray" to their paint and primer in one formula (note: Wedgewood Gray is not currently offered in the Pottery Barn collection by Benjamin Moore). They did an amazing job! (FYI: the Pottery Barn/Benjamin Moore paint goes for about $66/gallon. I spent $13 on my quart and have barely used even a quarter of it). Once it was all painted, we used a metric ton of Gorilla Glue to reattach the backer board, followed by two days of drying.

Here's the long-awaited after.


Have I mentioned the lighting in our house sucks?


Sorry for the flash but it was the only way to capture the turquoise on the back.

Top to bottom I decorated it with a few things that have been hiding in cupboards and on soffits. Top shelf: my favorite jewel red wine glasses from World Market. I bought them when Jason and I were first dating and have never found anything like them again (I actually have four, but three just looked better, and one has a tiny chip in it). I'd love to find two mercury glass votive to go in between these I think...


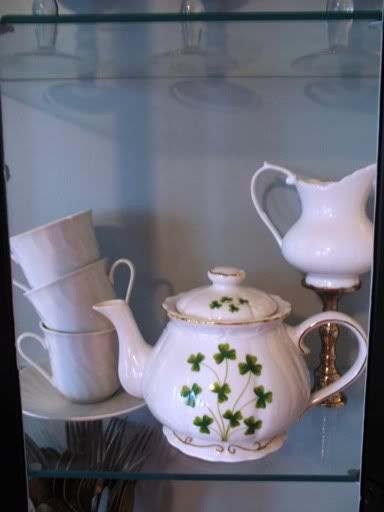
Middle shelf: my clover tea pot, purchased in Emerald Isle, North Carolina at their St. Patrick's Day Festival; little tea cups I purchased at a North Carolina flea market for a mere 10¢ each (I have a fourth one as well, but the tower was getting a little rickety...); and a small creamer pitcher I picked up at TJ Maxx sitting on top of a silver candle holder for some height. This is probably my favorite shelf (but shhhh! don't tell the others!).


Third shelf: a goblet with my family crest on it filled with vintage silverware; my little brass bell from an estate sale; two of my favorite tiny books (a book of love poems and my Irish O'merican book).


I love the way the brass bell picks up on the gold foil writing on the poetry book. 

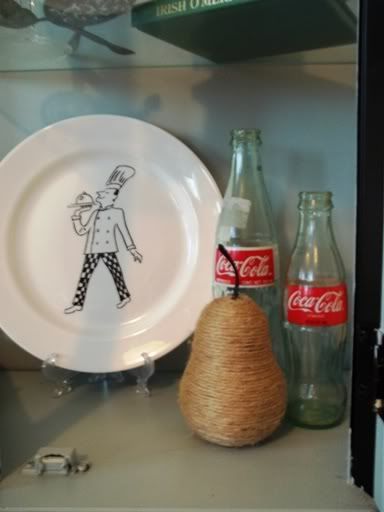
Bottom shelf--originally I had planned to stack some heirloom dishes in here that my mom has in storage, but for now this little arrangement works: a little chef plate I picked up from BB&B years ago; two "vintage" coke bottles (definitely not antique, but I love them anyways); one of my jute wrapped pears for a little texture.


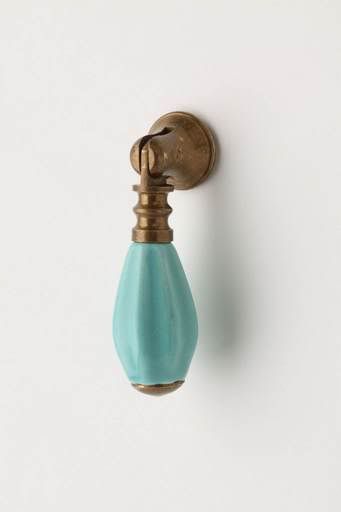
I'm extremely pleased with how it turned out, considering how it started! I may still decide to switch out the paint color of Lagoon (on the bottom part of the backer board) for an apple green later on down the road (like my favorite Martha Stewart wrapping paper). Why yes I did just link to my old blog twice in one post. I still have more work to do, mostly touch ups. I'm supper unimpressed with my 3M Blue Painter's Tape (so. much. bleeding.), I'd like to change out the hinges for an oil rubbed bronze (or maybe a silver to contrast the black), and I think I'm going to carry the Wedgewood Gray paint out onto the ledge around the display case. I'd also like to find a new drop pull for the door. Currently I'm loving this one from Anthropologie.


But for right now it's done, I can put dishes in it, and I love it!


COST BREAKDOWN:
Rust-Oleum gray primer (2 cans) - $8
Rust-Oleum Smooth Protective Enamel in satin black (2 cans) - $10
Rust-Oleum Lagoon - $0 (already owned)
Wedgewood Gray paint - $13
Rub n' Buff Silver Leaf (for drop pull) - $0 (already owned)
Decor - $0 (already owned)
TOTAL: $31

Thanks Grandma!♥

I'm linking up to:
Thrifty Thursday #52 at Thrifty Decorating

Tuesday, January 10, 2012

Eat your heart out Pottery Barn

A few months ago I started looking around a our master bedroom. I was feeling very underwhelmed. Black dressers. Black night stands. Black shelves...everything was feeling kind of heavy in there. We have plans to do a little make-over in there sometime soon (details to come later) but one thing I knew had to happen now was to bring in a little more warmth. I have a few ideas (maybe repainting the nightstands to a color and getting rid of all our silver accessories) but when I ran across this photo in a Pottery Barn magazine, I knew it was the perfect way to break up all that black.


But at about $75 a pop for the 3-foot sizes (and about $54 for the smaller ones), clearly this was a DIY job.

We picked up some brackets from IKEA to the tune of $3 a piece, and a 1"x6"x12' piece of pine wood from Home Depot for about $14. The lumber guys cut it into 4 pieces of 3-feet each (thus also making it transportable in our little 4-door vehicle). I also grabbed a medium sized can of Provincial stain ($8) so I could use it in future projects.

The wood was "distressed" by me taking a hammer, some nails, and a few other odds and ends and banging away like crazy. It got one coat of the Provincial stain (which looked way more honey colored on the samples at the store) and the IKEA brackets got a couple coats of grey primer and 2-3 coats of black spray paint.

One they were assembled, this is what we had:


You're only seeing one of them because apparently, I can't take a straight picture to save my life. But there are two shelves in our room. Here's what they looked liked before:


(We've since replaced this ancient looking television, BTW)

The new shelves are slightly bigger, which I was surprised with at first, but now I like. And the decor? Much more de-crapifying friendly (you should see how much room the bookcases are developing)! Oh, and did I mention these babies set us back just $11.50 a piece?? Yep--we made 4 shelves for a total of $46. A little over half of what it would have cost for just one of them from Pottery Barn. And I think they're almost identical.

The pile of decorap (that's my new contraction for decorating crap) is growing slowly but surely. Although now I'm faced with a bit of a conundrum--do I try to sell stuff? Or do I just donate to Goodwill? Hmm...

I'm linking up to:
Thrifty Thursday @ Thrifting Decorating

Wednesday, June 1, 2011

May 1/12, recap

So here's what got done...

The jute pears. Holy mother of jute. These suckers took forever to wrap, but I love the way they turned out. They add so much texture anywhere you put them.


The starfish and molding copy cat. So easy, so cute. So love.


My rustic sign for our kitchen soffits. Learn the story behind the Groc. & Grill in this post.


My failed attempt at the BH&G knock-off head board. Check out that pitiful and painful confession here (I re-hung our old upholstered headboard for now).


The bathroom caddy. I did it for F-R-E-E baby! Check it out here.


Along the way I was able to pare down the list as well. When it comes time to build the shelves, I'm now only going to build two sets, and I'll probably opt for something more like this (from Ana White).


The things I still want to do in the future? That canvas and burlap pillow is still calling my name. But I'm kind of overwhelmed with pillows at this point, so I'd have to find a place for it first. The DIY dresser knobs are still high on my to-do list. I want to replace the drawer handles in our master bedroom so bad! The rustic barstool would still be fun to DIY. I know I want barstools for our kitchen so I'll still be on the look out for something. And as for the wooden chargers? I may still do those...I already have a template traced, now it's just a matter of cutting and painting them and we all know how quick I am in that respect! :)


The adorable garden caddy I wanted to build, I'm choosing not to. At least not now. If we had more of an outdoor eating area I might. But we don't so for now it's going way on the back burner.


The mason jars I wanted to modge podge with blue food coloring? Well, those are now sitting in my blue bathroom caddy! So I'm thinking they'll stay clear ;)

So for all May entailed, I think I accomplished quite a few things. Now if you'll excuse me, I have to get started on my June list!

Wednesday, May 25, 2011

Big. Fat. BLEEPING. Fail.

OMG I'm not even kidding. I'm so freaking ticked off, disgusted, and spiteful right now. I hate the way the headboard turned out. Did you get that? Did the bold font make it loud and clear? H-A-T-E hate. By the time you read this, I've already take it down and am devising a plan on a.) what to do with our blank bedroom wall and b.) trying to decide what I'm going to do with the leftover wood. I'm going to show you a photo of how it turned out, just so I can show and tell you what went wrong and why I was actually on the brink of closing up shop, hanging up my hammer, and swearing off DIY projects all together. Like, seriously. Was having that kind of pity party.

To refresh your memory, this pretty little picture was my inspiration.


And here's its fugly wannabe doppelganger (notice I didn't even make the bed for this shot).


The cushions were ones I had lying around the house from IKEA. I just hot glued painted buttons into the tufted areas to make them more defined. Somehow, when I actually hung the cushions (a.k.a. nailed them on because the hook system I had originally planned on also failed) they squished together and left me with a six inch gap on the end. ????? Which is bitterly ironic, because the shelf is 6-inches too long for the bed, but that's because when I was planning on hanging the cushions from hooks, that's the size it had to be! Also, after washing drying, and vainly attempting to steam them, the cushions are still so ridiculously wrinkled! And then there are the knot holes in the pine. They would have been beautiful if I had stained the wood (which I didn't because I could finish a color I liked) but painted it just looks odd. And that brings me to the paint color itself. Not so sure how much I'm loving that yellow...although it does look nice with the lemon wreath I have hanging...

So there you have it. My big fat bleeping fail of a headboard. I'm literally cursing it and just want to rip it apart with my bare hands. But I know all that would do is ruin perfectly salvageable wood and leave me with splintered bleeding hands.

But I am not happy. And as of this posting, I have no idea what the heck I'm going to do with that blank wall which is now mocking me...

Wednesday, April 27, 2011

So much to do, so little time...

So, I have like a million things I want to show you, but if I wrote a post on each of them it would probably take up the rest of the year to show case each and everyone of them. So how about I do one post touching on all the things I really really really want to do in the super near furture (and a few I'm working on right now)?


1. I'm dying to try my hand at these storage caddies (photo from That's My Letter, plans from Ana White) 2. I love how this white pencil starfish mounted on a piece of moudling adds a touch of coatsal charm (from The Shabby Chic Cottage) 3. These stenciled stools are popping up everywhere, and I'd love to make some for our breakfast bar (photo from The Painted Hive) 4. After many failed attempts at finding a way to DIY new knobs for our dresser, I've finally found something I like (from The Painted Hive) 5. This simple white pillow with a burlap accent has me swooning (photo source unknown) 6. I don't know how long I've had this photo tucked away in my inspiration files, but I'm currently working on replicating this headboard (from Better Homes & Gardens) 7. Our soffits are crying out for a little vintage sign (photo from That's My Letter)


8. I'd love to find something similar to this for our bathroom--the hunt is on (photo source unkown) 9. My plan is to build something like this to hang the cushions from for our new head board (from etsy) 10. I'm itching to try the old modge-podge-and-food-coloring trick to turn plain mason jars into blue ones (photo source unknown) 11. This wooden utensil caddy is so freaking adorable--I'm hoping I have the right scraps to make this soon (from Ana White) 12. Aren't these DIY charges cute? And so easy to make (from Shanty to Chic) 13. I plan to make two sets of the barn beam ledges--one set for our master bedroom, and one for down stairs (from Ana White)

That was just the quick run down! As I said before: so much to do, so little time...

Wednesday, April 20, 2011

The console table, take two

I have to admit that I'm surprised with myself. I had this table all "put together," but I went back and ripped everything apart just to put it back together. I'm the first to admit that I like to take shortcuts (even if it means more work in the end, which this definitely would have been). But seeing the new table, knowing it was done right, makes me so proud. As Chandler Bing would say, "Look at me, I'm growing." So here's how it turned out (remember I used this plan from Ana White).


I'd still like to add a nice trim--I think that will really help finish it off. I'd also like to build out from the sides and create a few more samller shelves...one of these days ;) Oh, and I didn't end up using my bead board wall paper afterall! I thought it would be nice to use a sunshine yellow to give it a pop of color, but when I posistioned it inside the cosole table I was really not loving it.


It almost seems too...warm? I don't know, but the color was not making me happy. And truth be told, neither was the bead board. So I ran to our supply closet and pulled out some leftover wrapping paper. You may remember I used it on the bookcases in our office (when it was upstairs).


The wrapping paper is called "Granny Smith and Pea Shoot" and is by Miss Martha herself. It's so fresh and clean--perfect for the blossoming spring we have going on here! Unfortunately, it's been discontinued. Which is very sad because I pink puffy he♥rt love it.


So, there we have it! Our new console table. It's so nice to have a place for extra dishes, placemats, napkins and napkin rings now. I can't wait to serv up our first buffet on it!

I'm linking up to:
Power of Paint Party @ Domestically Speaking
Wow Us Wednesday @ Savvy Southern Style
Transformation Thursday @ The Shabby Chic Cottage
Project Parade @ The DIY Show Off
Related Posts Plugin for WordPress, Blogger...